Creating a balloon dog might seem like a challenging task, but with the right techniques and practice, anyone can master this fun and entertaining art form. Whether you're planning to entertain kids at a party or simply want to learn something new, balloon twisting is a great skill to have. This guide will walk you through the process of making a balloon dog step by step, ensuring you become an expert in no time.
Twisting balloons into shapes is not only fun but also a great way to engage with children and add a playful touch to any event. Learning how to make a balloon dog is an excellent starting point for beginners. Once you've mastered this shape, you can explore more complex designs and expand your repertoire.
Throughout this article, we'll cover everything from the basics of balloon twisting to advanced tips that will help you create the perfect balloon dog. By the end of this guide, you'll have the confidence and skills to impress your friends and family with your newfound talent.
Read also:What Is Mills Lane Net Worth 2024 How He Built His Wealth And Career
Table of Contents
1. Materials Needed for Balloon Dog Making
2. Understanding the Basics of Balloon Twisting
3. Step 1: Inflate the Balloon Properly
4. Step 2: Create the First Twist
Read also:What Is Kevin Mcbride Net Worth 2024 Career Achievements Finances
7. Step 5: Create the Body and Legs
9. Tips for Perfecting Your Balloon Dog
10. Exploring Variations of Balloon Animals
Materials Needed for Balloon Dog Making
Before diving into the process of how to make a balloon dog, it's essential to gather the right materials. Having the correct tools will make the process smoother and more enjoyable. Here’s what you’ll need:
- 260Q Balloon: This is the standard size used for most balloon twisting creations.
- Pump: A manual or electric pump can help you inflate the balloon more easily.
- Scissors: Optional, but useful for cutting the balloon if needed.
Quality balloons are key to creating a durable and well-shaped balloon dog. The 260Q balloon is specifically designed for twisting, making it easier to manipulate into various shapes.
Understanding the Basics of Balloon Twisting
What is Balloon Twisting?
Balloon twisting is the art of inflating and shaping balloons into various figures and designs. It requires skill, patience, and creativity to transform a simple balloon into an intricate sculpture. Balloon twisting is not only entertaining but also a great way to develop hand-eye coordination and problem-solving skills.
Why Start with a Balloon Dog?
The balloon dog is one of the simplest and most popular shapes to create. It serves as an excellent foundation for beginners and provides a clear understanding of basic twisting techniques. Once you’ve mastered the dog, you can move on to more complex designs like swords, flowers, or even more elaborate animals.
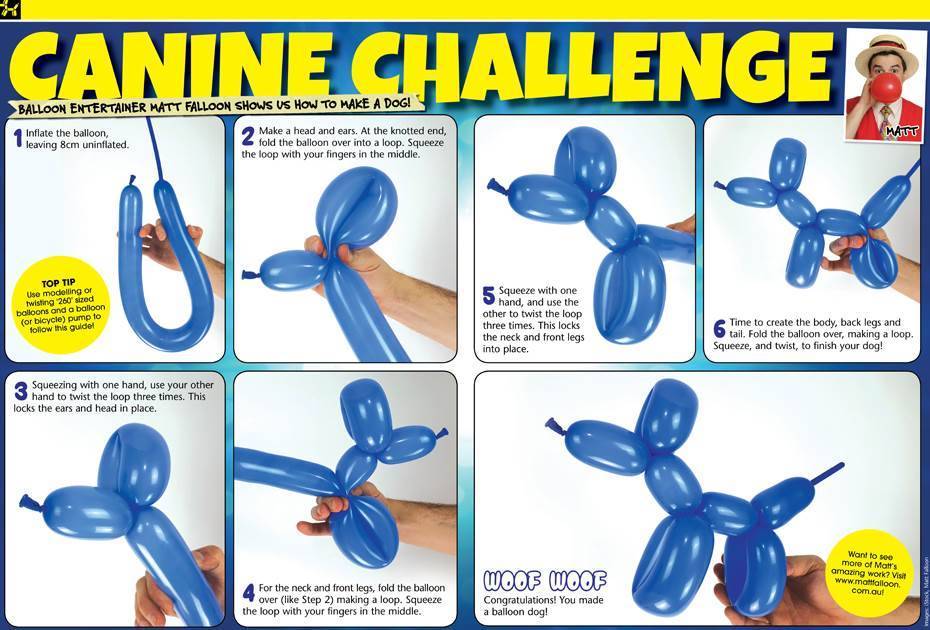
Step 1: Inflate the Balloon Properly
Inflating the balloon is the first and most crucial step in learning how to make a balloon dog. Proper inflation ensures that the balloon is neither too tight nor too loose, making it easier to twist and shape.
Leave about 2-3 inches of uninflated space at the end of the balloon. This extra space will act as a buffer, allowing you to create the tail and legs without popping the balloon.
Step 2: Create the First Twist
After inflating the balloon, hold it near the nozzle end and create a small bubble by twisting the balloon tightly for about 2 inches. This bubble will eventually become the dog's head.
It’s important to twist the balloon firmly to prevent air from escaping and to ensure that the bubbles stay in place.
Step 3: Form the Head
Take the small bubble you created in the previous step and fold it back towards the nozzle. Secure the fold with another twist to form the dog's head. This step is where the dog's shape starts to take form, so make sure the head is proportionate to the rest of the balloon.
According to balloon twisting experts, the head should be about one-tenth of the total balloon length for optimal balance.
Step 4: Make the Ears
Now that you have the head, it’s time to add the ears. Create two small bubbles by twisting the balloon twice, each about 1 inch in length. Fold these bubbles upwards to form the ears and secure them with another twist.
This step requires precision to ensure that the ears are symmetrical and evenly spaced. Practice makes perfect, so don’t be discouraged if your first attempts aren’t flawless.
Step 5: Create the Body and Legs
The next step involves creating the body and legs of the balloon dog. Begin by twisting the balloon into four equal sections, each about 3 inches long. These sections will form the front and back legs of the dog.
Once you’ve twisted the sections, fold the balloon into a zigzag pattern to create the legs. Secure each fold with a twist to keep the shape intact.
Step 6: Shape the Tail
The final step in learning how to make a balloon dog is shaping the tail. Take the uninflated end of the balloon and twist it to form a small tail. Attach the tail to the back of the dog by tucking it into the last fold.
Ensure that the tail is securely twisted to prevent it from coming undone. Your balloon dog is now complete!
Tips for Perfecting Your Balloon Dog
Here are some additional tips to help you refine your balloon dog-making skills:
- Practice regularly to improve your twisting techniques.
- Use high-quality balloons for better results.
- Experiment with different colors to create unique designs.
- Be patient and don’t get discouraged if your first attempts aren’t perfect.
According to a study published in the Journal of Creative Arts Therapies, engaging in creative activities like balloon twisting can reduce stress and improve mental well-being.
Exploring Variations of Balloon Animals
Other Popular Balloon Animals
Once you’ve mastered the balloon dog, you can explore other popular balloon animals such as:
- Balloon Sword
- Balloon Flower
- Balloon Heart
Each of these designs builds on the basic techniques you’ve learned, allowing you to expand your skills and creativity.
Advanced Techniques
For those looking to take their balloon twisting to the next level, advanced techniques like multi-balloon sculptures and complex shapes can provide new challenges and opportunities for growth. Consider joining local balloon twisting communities or attending workshops to further enhance your skills.
Conclusion: Get Twisting!
In conclusion, learning how to make a balloon dog is a fun and rewarding experience that can be enjoyed by people of all ages. By following the steps outlined in this guide, you’ll be able to create a perfect balloon dog and impress your friends and family with your newfound talent.
We encourage you to practice regularly and explore other balloon animal designs. Don’t forget to share your creations with others and leave a comment below to let us know how your balloon twisting journey is going. Happy twisting!
For more information on balloon twisting, you can refer to the following resources:
- BalloonHQ - A comprehensive resource for all things balloon-related.
- Balloon Artist - A website dedicated to balloon twisting tutorials and tips.
/dog-balloon-animal-583d18485f9b58d5b172347f.jpg)

